Peanut Butter Chocolate Cake – my 30th birthday cake!
Posted: July 19, 2011 Filed under: Cake, Recipe | Tags: Buttercream, Cake, Chocolate, Fondant, Peanut Butter 7 CommentsBirthdays are pretty special regardless but I think some are more special than others. 16 is a big deal as it brings about the freedom of a drivers licence, in BC (and most of Canada) 19 is important since it signifies what I am going to call “the new responsibilities that go along with being legal drinking age”, and then it is 30. There is no real reason that 30 should be special as nothing actually changes in life at that age but it seems that 30 is the end of the “younger years”. To me it has always been the age where you really start to ‘get’ life. You know who you are. You know what you want (and of course don’t want). You know what is important to you. You have the ability to say no to the things that aren’t. And you just really are ready for real life to “bring it!” That was me this past weekend. And just to be clear: I actually had been looking forward to my 30s for years! It even happened that my 30th birthday was on a Saturday!
The day started early – by my choice. I wanted to run a race. Now I have run enough races that it wasn’t like I wanted to do something new and exciting on my 30th, I just wanted to start the year with something I loved and something that I find important in my life! So a 10km race in the rain! It was a blast. I had 3 friends join for the run and one that came as “support crew”. The beginning was a lot of fun as 3 of us chased each other and traded on the lead. And then it settled in to me following closely behind one friend for the rest of the race while the other two followed not far behind. I was hoping that I would have this burst of speed at the end and pass my friend but apparently he also had some kick for the end so I followed in behind 13 seconds after him at a decent race time of 53min35sec. A good start to the day!
Anyways, this is a baking blog so I better cut to the chase! Of course I needed to make a cake. I understand that some may think it is taboo to make your own cake but I really wanted to make it! For me it was a special treat! I love making desserts for other people and I love to make perfect desserts for the tastes of the recipient (so mango cake for my mango loving friend, chocolate coconut cupcakes for my friend that has loves that flavour combo, lemon for the lemon lovers, etc). So for me, it was extra special to make the cake that I would want! Instead of it being a hassle or extra work for me when I should be “enjoying”, it turned into being allowed to make MY perfect cake! What a treat!
My favourite flavour combination of all time isn’t very refined or very mature: it is the classic chocolate and peanut butter. I love it. It is simply the perfect balance! Of course this is what my cake had to be. I had made chocolate cupcakes (I’ll post those later this week) the previous weekend so I made the middle layer of the cake from that and froze it (I’ll add the link for that part of the cake once I write it). The other two layers – top and bottom – had to be peanut butter cake. And between the layers, well that was a mixture of several things. First, on the bottom was chocolate ganache (leftover from the cupcakes as well) and a peanut butter buttercream. Then, between the 2nd & 3rd layers was leftover chocolate marshmallow mousse (or that is what I am calling it). (Apparently I needed to use up some leftovers!) The cake was then covered in more peanut butter buttercream. And then came the home made chocolate fondant. I thought this was a good time to try making my own! That will be a post all on its own! (If you choose to make this recipe, it is not necessary to use the same fillings as I did! But if you want my opinion, I would go with the Chocolate Marshmallow Mousse filling.)
It turned out AMAZING! Although I don’t love the taste of fondant, I love how it seals in the moisture and makes for a more delicious cake! This fondant was also tastier and less gummy than most. We went for dinner at a fantastic restaurant that had prepared a 3 course meal especially for us (with a menu that had my name on it!) including dessert but everyone was still ok with eating a 2nd dessert and most finished it!! Those that didn’t (including myself) took home their leftovers! Although it was quite rich, I only heard rave reviews (unless they were just being nice to me because it was my birthday!)
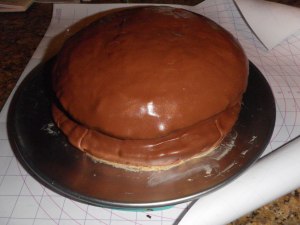
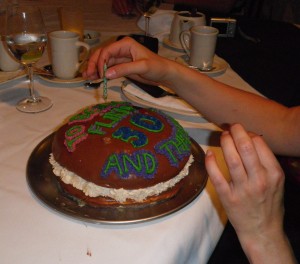
Now for the shape, I couldn’t just do a regular round or square cake – I wanted a giant Whoopie Pie cake! (Just in case someone missed it – I love making Whoopie Pies and you should check out my Whoopie Pie blog!) So I carved a little here and there, cut the top to a dome shape, carved the chocolate cake to be about an inch smaller in diameter and then shaped the fondant over the top. I also piped more peanut butter buttercream around the outside as the “filling” for the Whoopie Pie! It turned out almost identical to my vision in my head (except for the imperfections in the fondant).
On the top, well I couldn’t write “Happy Birthday Becky!” That seemed a little odd. So I went with a quote from a movie. Although I am not “13 Going on 30”, like I said before, I had been looking forward to 30 as I saw myself being “Flirty, 30 and Thriving”… uh oh, as I write this now I just realized it is supposed to be “30, Flirty and Thriving”. I don’t know why I got ‘flirty’ in my head first. Oh well, too late! The cake was made and eaten as a tribute “to being flirty, 30 and thriving!”
Decadent Buttermilk Chocolate Cake
Ok, so I am not putting the recipe here (this post is crazy long as is!), I am putting it on another post linked here. The recipe made enough for 1-9″ layer, 12 regular sized cupcakes and 12 mini cupcakes. If you want to just use it for this cake, you should likely only make 1/2 the recipe and make an additional 6-8 cupcakes (or make 2 layers and freeze one for use later).
Peanut Butter-cup Cake
(from Best-Loved Desserts by Good Housekeeping – an awesome cookbook!)
-
2 cups flour
- 1 tsp baking powder
- 3/4 cup creamy peanut butter
- 1/2 cup soft butter
- 1 cup white sugar
- 1/2 cup packed brown sugar
- 2 eggs
- 2 tsp vaninlla
- 2/3 cup milk
- Preheat oven to 325°F. Grease 2 9″ cake pans and line the bottoms with parchment paper.
- In a small bowl, whisk together flour and baking soda.
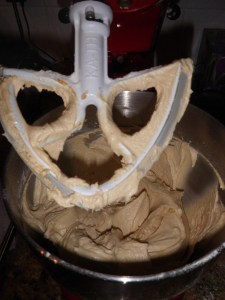
- With a stand mixer, beat butter and peanut butter a minute or so until creamy. Add both sugars and continue beating for a few more minutes. Add eggs one at a time and then the vanilla.
- Alternate between adding the flour and the milk, begin & end with the flour. Beat just until smooth.
- Split batter between the two pans and bake about 40-45 minutes.
- Cool cake in pan 15-20 min before removing it to cool completely on a rack.
Chocolate Ganache
Scald 1/2 cup of whipping cream but don’t let it boil (it should just start to have bubbles on the top.) Pour over 1/2 cup or 4 oz chopped semi-sweet chocolate. Let sit 2 min then stir until smooth. Allow to cool before using.
Peanut Butter Buttercream
Oops, I should have payed more attention to what I did! I just made this up as I went and didn’t measure a single thing. Basically what it was was 1/2-3/4 cup peanut butter, 1/4 cup cream cheese, 1/4 cup butter, 1 tsp vanilla and about 3-4 cups of icing sugar. Add cream/milk 1 tsp at a time until the icing is a good consistency for icing. Sorry I can’t say for sure what it was! (I actually used some leftover cream cheese icing and added peanut butter and more sugar to it so this is why I really don’t know!)
Chocolate Marshmallow Mousse Filling
See the filling here for the Whoopie Pies I previously made.
Chocolate Fondant
This recipe and process will get its own entire page! But you will have to wait a couple days!
Assembly:
Of course you can use whatever filling you want but this is what I did!
- Start with a layer of the Peanut Butter Cake.
- Spread ganache over the top and then peanut butter buttercream over the cake layer.
- Cover with the chocolate cake layer.
- Spread the Chocolate Marshmallow Mousse on top of the chocolate cake.
- Top with the Peanut Butter Cake.
- Cover the whole thing with Peanut Butter Buttercream.
- Cover with rolled chocolate Fondant!


