Macarons – two recipes, one flopped, one passed!
Posted: April 21, 2013 | Author: bexbakesandcakes | Filed under: Cookies, Recipe | Tags: Caramel, French Pastries, Gluten-Free, ground almonds, Macarons | Leave a commentBack in March my friend and I did a class on how to make Macarons. Not macaroons (the chewy, coconut-heavy treats) but rather macarons (a French treat that looks like a little sandwich cookie but is meringue like with ground almonds and no flour.) So when Love & Olive Oil made Macarons the April Kitchen Challenge, I figured I was ready!
Pretty much every recipe you come across claims that you have to weigh each ingredient very accurately. I had come across this recipe for Simple Macarons before that used normal kitchen measurements and did not require a kitchen scale, I figured it was worth a try. I made them just before Easter but I hadn’t expected them to work so I didn’t take any pictures. I was making them alongside my Nutella trifle and had a few other things to do so I cheated on the filling and just used a lemon spread that I had in the fridge. They were decent. They were chewy & tasty enough. But not exceptional. Then again I slightly over baked them and the filling wasn’t anything special.
But then Friday night I had the most amazing ones that someone brought to a party I was at. They were so delicious. The texture was perfect. The fillings (my favs were the salted caramel and the vanilla white chocolate) were intense and flavourful. It made me want to master the treats and made me realize that the filling was the key for flavour while the outside was the key for texture.
Wikipedia claims “the confection is characterised by smooth, squared top, ruffled circumference (referred to as the “foot” or “pied”), and flat base. It is mildly moist and easily melts in the mouth.” This was the goal.
So last night, my friend (that I had done the class with) and I decided to try two recipes: the one we had learned in class (my friend has a kitchen scale for accurate measurements), and the one that I had just used that required no scale.
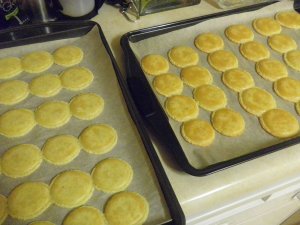 Conclusion: no need for weighing your ingredients. The ones that we did that way flopped -BADLY! We are not really sure what happened. They developed the desired ‘foot’ but it flattened and spread and the tops just collapsed rather than rising well. We aren’t sure if we over mixed the ‘macaronage’ or under mixed it (the macaronage is what the batter is called after mixing everything together). And since my friend did one recipe and I did the other, we didn’t make any direct comparison of the two macaronages. So who knows??
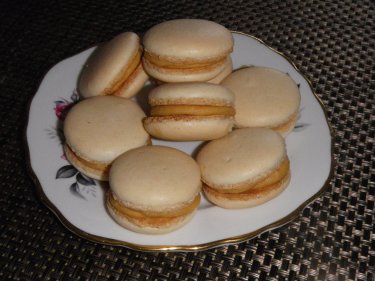
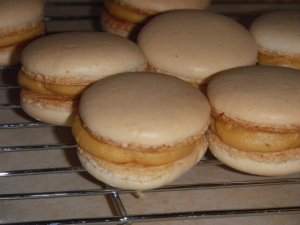 But these “Simple Macarons” that do NOT require accurate weight measurements turned out pretty good for a second time. They could have a taller foot or a slightly shinier top but otherwise, I think they look pretty good. And after aging them for 24hrs, they were “mildly moist and easily melted in the mouth” as we want! Actually the texture was really quite good. We filled them with a salted caramel buttercream. I am not including the recipe here because I wasn’t really paying attention to what my friend was doing. This looks like a decent recipe though.
Here are the basic steps:
Beat 2 egg whites on medium until frothy (as shown on the left) and then add 3 1/2 Tb sugar. Continue beating on medium-high until stiff peaks form (about 5 minutes total). The egg whites should form a ball in the whisk when you pull it out (as shown on the right). You can add food colouring if you like at this time. We didn’t.
In a separate bowl, sift together 2/3 cup icing sugar and 3/4 cup ground almonds. Stir this in to the egg whites, half at a time. This is where you make the macaronage. Unfortunately I didn’t take any pics of this most-important step. Unlike what you would normally do, you don’t have to be careful with the egg whites: you are trying to deflate them. So with a rubber spatula, mix in half the sugar-almond mixture, then the 2nd half. Keep stirring rather harshly until the batter becomes thinner and will fall as a ‘ribbon’ off of the spatula when you lift it out of the bowl. The ribbon should reincorporate into the batter after about 20-30 seconds (in other words, it shouldm’t remain as a big dollop or anything).
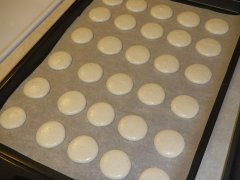
Spoon the batter into a piping bag with tip #1 (Wilton) attached. I have a template that I put under the parchment paper (as seen in the pic) to know how big to pipe the circles. I am pretty sure they are 1.5inch circles but the person made them for us in the macaron class. Once they are piped, bang the sheet on the counter 2 or 3 times to get the air pockets out. Then allow the macarons to dry for 30 minutes. Preheat your oven to 350F at the end of this.
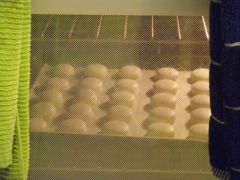
Bake for 8 to 10 minutes. Don’t let them overbrown and rotate them if you need to. They should darken a little and be firm but shouldn’t darken too much. We overbaked ours a tiny bit but they were still fine. They should also form the little frilly feet at the bottom. Note: mid-baking you may or may not be able to tell how successful your macarons will be. The ones on the left below eventually were the VERY FAILED batch. They looked decent at this point and we were excited. Compared to the ones on the right though that worked well, they are flatter.
Remove from the oven and allow them to cool on the baking sheet before removing them. Once they are cooled, you can fill them with your desired filling. On the right is a picture of the bad ones, which we still filled, compared to the good ones. Wow, those are some ugly Macarons!
Once your Macarons are filled, you can eat them BUT it is better to let them ripen/age at least 24 hours. This will soften in the macaron and give it that perfectly chewy, melty texture!
So don’t be afraid of Macarons! They don’t need to be weighed and they can still turn out well! But if you need to know what went wrong, don’t ask me! I don’t know why the other ones failed. I just know which recipe I will stick to! The easy one!


